This “How to Guide” walks you through the process of setting up a Raspberry Pi to loop videos on TVs within a museum or gallery setting, streamlining the playback experience. Whether you’re a curator wanting to enhance your exhibit or someone who just needs to play a video on a loop, this guide will help you create a polished and continuous visual display with inexpensive, yet reliable, equipment.
If you haven’t already taken a look at the first article in the MP4Museum series where we use the free Open Source MP4Museum software with a Raspberry Pi computer, then it is worth reviewing it before continuing with this guide. This guide accepts some level of technical knowledge but has been written to be as accessible as possible. If you are unsure about the following steps, please get in touch and we can have a chat to see how I might be able to help you.
With that all out the way let’s begin:
What we need
To embark on this project, we’ll need to collect a few components. Assuming we possess a TV/display we should expect to spend around £75 to £80 to obtain all items from brand-new. See the list below for the items we’re going to need:
- MP4Museum software
- Raspberry Pi 4 Model B
- Raspberry Pi Case
- Raspberry Pi Power supply
- Micro-HDMI to HDMI cable
- Micro-SD card
- TV or monitor
And we’ll need the following equipment:
- Windows or Apple Mac PC/Laptop
- A micro-SD card reader (or an SD card reader with a micro-SD to SD card adapter)
- Memory stick with our MP4 video files on it
MP4 Museum Software
This software is free and “Open Source”. This means, if you’re feeling brave, you can look at and modify the computer code that makes it work. It is designed to be used by museums, galleries, or anyone else that needs to show video content within a display reliably. It is created and maintained by Julius Schmiedel at the MP4Museum website: www.mp4museum.org.
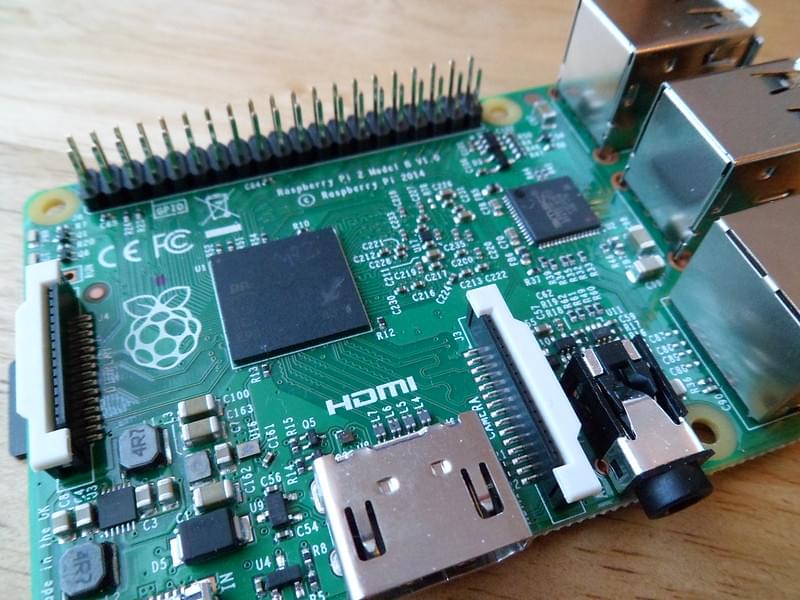
Raspberry Pi 4 Model B
The Raspberry Pi comes in different models we’ll need the 4B version at the time of writing, but older models will also work if you already have one. The 4B comes with different RAM sizes of 2GB, 4GB and 8GB (GB = Gigabytes). The 2GB model is sufficient, but the more expensive 4GB or 8GB models will work too.
As the Raspberry Pi is designed to be used for lots of different things it is built modularly and it doesn’t include all the bits we’ll need out of the box such as a power supply, SD card, or case. The following sections will explain further.
Raspberry Pi Case
The Raspberry Pi comes as just a circuit board. Depending on how you use it you can buy (or 3D print) cases to suit your application. For example, a waterproof case might be needed in an outdoor environment, and a case with room for extra sensors might be needed if we’re making an indoor air quality meter.
For our purposes a basic case will work fine. Something like the Official Raspberry Pi case will work perfectly for us.
If we wanted this media player to have wired controls to play, pause, and skip videos then we should get a case that has the “GPIO pins” exposed. These pins are customisable plugs we can use to wire up physical switches. Alternatively, we can drill our case to allow the wires to pass through.
Raspberry Pi Power Supply
The Raspberry Pi is powered with a USB-C plug (the same type as many smartphones today). It requires this plug to supply 16 Watts of power in the worst case. The easiest option is to buy the Official Raspberry Pi power supply which is very affordable and designed specifically for this purpose. A spare 20 Watt iPad or phone charger would also be sufficient if we had one.
Micro-HDMI to HDMI cable
Due to the Raspberry Pi’s small size, it uses a “micro” version of HDMI so our cable that we’ll need to use for connection to the display will need to account for this. Any “micro-HDMI to HDMI” cable will be sufficient for this purpose. As the Raspberry Pi will be best placed at the back of the TV a short cable should be fine.
Micro-SD Card
The Raspberry Pi does not have an onboard hard disk. It uses a removable micro-SD card (not to be confused with a full-sized SD card) that you might find in a camera or smartphone. We’ll need one to load the MP4Museum software onto the Raspberry Pi. Any card 16GB (Gigabyte) or above will be suitable. SD cards are specified for particular speed (sometimes called classes). Our application we don’t need a fast card so a cheap SD card will be perfectly acceptable.
TV/Display
Any TV or display with an HDMI port is sufficient for this project. If we need to source a display as part of this project, then a “dumb” as opposed to “smart” TV is ideal. Now obsolete to many, “dumb” TVs are abundantly available for a mere £20 to £40, ensuring an affordable large-screen solution. Local second-hand marketplaces as well as Facebook Marketplace and eBay are great places to source this equipment.
If your content includes sound, then the HDMI cable will be able to transfer both audio and video to your display. It is also possible to take the sound out of the 3.5mm audio jack if your display can’t do sound or you have a separate sound system. In this case additional configuration is required outside of the scope of this guide.
Making it work
There are two steps to complete this project:
Installing MP4 Museum
The Raspberry Pi Computer doesn’t have a built-in hard drive. Instead, it uses a micro-SD card which you may have used in a smartphone or camera. To power up our Raspberry Pi we need to load our micro SD card up with MP4 Museum. This can be completed in a series of short steps. You’ll need a PC or Laptop with a micro-SD card reader (or an SD card reader with a micro-SD to SD adapter card).
-
Download MP4Museum - We’ll start off downloading MP4 Museum from the official website at www.mp4museum.org/download. You should end up with a zip file which is about 3.5 Gigabytes.
-
Next, we need to download the Official Raspberry Pi imaging software which we’ll use with the MP4Museum zip file to load the micro-SD card. You can find this software at www.raspberrypi.com/software. There are versions for Windows and Mac.
-
Run the installer for the Raspberry Pi Imager and follow the steps in the install wizard.
-
Once installed, open the imaging software you just installed. You should see a menu with two options: operating system and storage.
-
We’re going to click on “CHOOSE OS”, and then in the list that appears scroll to the bottom and select “Use custom”.
-
Now we will see a prompt for us to choose a file. Navigate to your downloads folder and select the MP4Museum file we downloaded in step 1 and click “Open”. After selecting our OS we’re now back at the first menu we saw when opening the imager software except now the name of the zip file you downloaded is shown where the “CHOOSE OS” was before.
-
Click the “CHOOSE STORAGE” button which will launch a new window which shows all of the removable devices that are plugged into your PC/Laptop. If there are no devices, then the list will be blank.
-
Insert the micro-SD card into your PC/laptop and observe it to show up in the list of removable drives. It may take a few moments for the software to realise the device is plugged in.
-
Once it appears in the list click the newly inserted device. You will be back at the first menu again with the “Storage” box now populated with the removable device you chose.
-
WARNING: If you have other removable drives inserted into your machine and you select the wrong device this process will permanently erase them so to be sure you are selecting the correct device. It is a good idea to remove all other devices if possible. Click the “WRITE” button and confirm in the pop-up that you have the correct device selected.
-
The software will now run through the installation process and once it completes the imaging software can be closed and the SD card removed.
Putting it all together
Once you have installed the MP4 Museum software onto your SD card you’re ready to connect everything together and start the system. Use the following steps:
-
Install the Raspberry Pi into the case ensuring the ports and locating hole line up correctly.
-
Insert the micro-SD card into the slot on the bottom of the device.
-
Connect the HDMI cable to either of the micro-HDMI ports on the Raspberry Pi and an available HDMI port on the TV/display.
-
Plug in the USB stick with video files on it into one of the available USB ports on the Raspberry Pi.
-
Turn on the TV and set it to the right channel.
-
Plug the Raspberry Pi power supply in at the mains and then into the Raspberry Pi device.
-
Wait for MP4Museum to start up and begin playback of your files. There will be a short blank screen, and then the MP4Museum logo will come up with a brief jingle. Video playback will then start.
We’re done! Your videos should now be playing on a loop.
N.B. If you’re playing more than one video, you’ll need to make sure that they are in alphabetical order based on their filename. An easy way to achieve this is to prepend a number to the filename corresponding to the intended play order.
Taking it further
You should now have a good idea for what can be achieved with MP4Museum and a Raspberry Pi. You can read more about the MP4Museum project at www.mp4museum.org. It is worth knowing MP4Museum can be modified to allow extra features such as allowing play/pause buttons and synchronised playback between multiple devices. Raspberry Pi computers have a lot of other uses too.
If all of this sounds good but you need a little help getting started, or you’d like to modify MP4Museum to your needs I can help you with that. Why not get in touch and we can have a chat about your needs.